Showing posts with label Lime. Show all posts

Wednesday, October 16, 2013

Bite-size Key Lime Pies

Today I bestow upon you, my handful of devoted readers (and the remainder of you whom I have guilt-tripped into reading this blog), the cutest thing I have ever made, nay, quite possibly, the cutest thing ever. Ok, ok, these pies aren't the cutest thing ever because the creatures have already claimed that title. C'mon:

Sometimes they do things that are so cute it
actually makes me hate them just a little bit.

These pies are pretty darn adorable nonetheless. When I took them to a BBQ, they were met with many "squees" and "oh.my.gods!" And when I brought some to work, I learned an important life lesson - the road to workplace popularity is paved with bite-size pies.

This is my go-to key lime pie recipe baked in mini muffin tins that I lined with homemade graham cracker crust. Gather 5 limes (as previously noted, it's not necessary to deal with the hassle of using key limes), graham cracker crumbs, unsalted butter, sugar, eggs, and sweetened condensed milk. The recipe below makes two dozen lil pies.

As usual, I doubled the recipe, so this picture contains more ingredients than you will need. You'll only need 1 can of sweetened condensed milk, 5 limes, one stick of butter and 3 eggs.

Measure 1 1/2 cups of graham cracker crumbs (you can buy the crumbs or use a food processor to crush the crackers into a fine powder).  In a small bowl, mix 1/3 of a cup of white sugar with the crumbs.  Then pour 6 tablespoons of melted butter over the crumbs and mix with a fork until all the crumbs are wet. 


Line a mini muffin dish with paper liners, or brush them with butter.  The paper liners were easier for cleanup, plus they gave the crust a nice zigzag edge. Using a rounded teaspoon, spoon about 1 1/2 teaspoons of the crumb mixture into the cups. Roll the rounded bottom of the teaspoon around the bottom of each cup, pressing the crumbs up along the edge and packing the crumbs together as you turn the spoon. It is much easier to use a round object to form the crust than to use your fingers. I imagine pressing a shot glass into each cup may also work, if it is the right size, but I didn't have a shot glass to test this theory.


Preheat the oven to 400 degrees as you finish forming the teensy crusts. Bake for 4 minutes (not 5 minutes, not 3 minutes...trust me, I tested both out. After 5 minutes, the crust becomes too dark, but after only 3 minutes, the crust does not stay together. It's science...).


While these are baking and cooling, zest 5 limes, cut them in half and juice them until you have 2 teaspoons of zest and 1/2 a cup of lime juice. Make sure to get all the delicious pulp into the juice because it adds a lot of flavor.


Mix the lime zest and juice with one 14 ounce can of sweetened condensed milk.


Then add three egg yolks and mix until it is blended thoroughly.


Next, spoon about 1 tablespoon of the filling into each cup until the filling reaches the edge of the graham cracker crust. The filling doesn't puff up, so it is fine to fill them all the way.


Reduce the oven's temperature to 350 degrees and bake for 10 minutes.  Let them cool, then refrigerate overnight. The next day, remove the paper liners (because you don't want anyone mistaking these for cupcakes, god forbid!). Then place them in a box lined with hot pink gingham tissue paper because OHMYGODTHESEARESOCUTE!


Seriously. 

Finally, make whipped cream. Using the Kitchenaid stand mixer that was totally worth all the money you spent, whip 1 cup of heavy cream on a high speed until it is thick. As it mixes, add 2 tablespoons of sugar and 1/2 a teaspoon of vanilla.

I put whipped cream on 2/3 of the pies and left 1/3 without. Surprisingly, the whipped-cream-free pies were pretty popular (but not as popular as the pies with whipped cream, because that would be insane).


I tried meringue on a few, but it didn't turn out quite right. The meringue didn't adhere to the filling, so it fell off after they baked. They looked nice before I put them in the oven, though:


I was really on a roll with my tiny pies and itty-bitty meringues, so I even attempted to make candied lime zest as a garnish. There I was, saying to myself "eat your heart out, Martha," when I tasted one of these and realized (bitterly) that I had better stick with the things I am good at.  So candy is out. Even if the zest hadn't tasted horrible, it wouldn't have been worth the effort I put forth just to make a garnish.


Key Lime Pie - makes 24 

Crust
1 1/2 cups graham cracker crumbs 
1/3 cup of white sugar 
6 tablespoons melted butter 

Preheat the oven to 400 degrees. Mix crumbs and sugar, then pour in melted butter, stirring as you pour. Press the crumb mixture into lined or buttered mini muffin tins, using the method described above. Bake for 4 minutes. 

Filling:
One 14-ounce can sweetened condensed milk
3 egg yolks 
1/2 cup fresh lime juice 
2 teaspoons lime zest

Reduce oven temperature to 350 degrees. Bake pies on middle rack for 10 minutes. Remove, let cool and refrigerate overnight (or at least 3 hours).

Whipped Cream:
1 cup heavy cream
2 tablespoons sugar
1/2 teaspoon vanilla

Mix heavy cream on medium-high heat, adding sugar and vanilla as it mixes until the whipped cream thick. Pipe onto the chilled pies before serving.

Monday, June 11, 2012

Chocolate-Dipped Key Lime Piesicles

Because I don't care if you get fat, here is a recipe for frozen key lime pie dipped in chocolate.
    
This is the same yolky batch as seen here.

I must say that the most time-consuming and annoying part of making these treats was finding those wooden popsicle sticks. I checked Walmart, Target, and a grocery store before resorting to the Dollar Store - a dismal, dismal place. One happy consequence of unemployment is that I don't mind wasting time driving all around town looking for popsicle sticks. It's the little things...


I had a long discussion with Jay while he was in the hospital about the logistics of adding the popsicle sticks without damaging the integrity of the pie. My original plan involved removing the individual slices and then inserting the sticks, but Jay argued that the sturdiness of the aluminum pie tin was essential. After an excessively lawyerly argument, tinged by the worry that our asinine debate would be the last thing his infirm roommate would ever hear, I conceded.

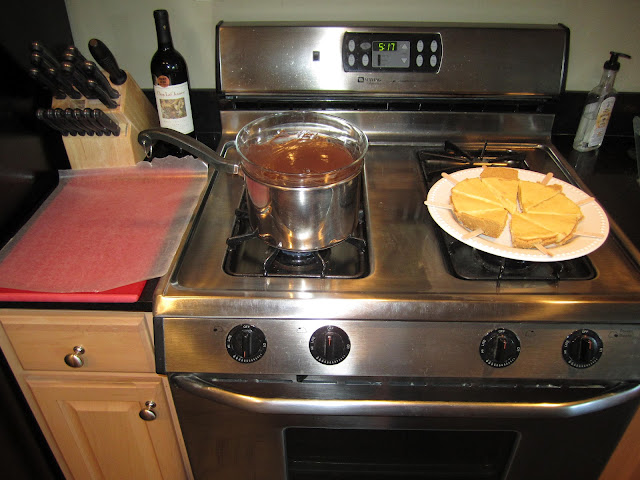
I scored 8 pieces then used a sharp paring knife to make horizontal slits in the foil as seen above. It was easy to insert the popsicle sticks. Next, I put the whole pie in the freezer for an hour.

After an hour, I removed the individual pieces by cutting away the tin - it was a bit of a hack job. 

Perfect for dipping

I put the individual pieces in the freezer overnight. You will notice it was difficult to keep the top edge of the graham cracker crust attached, but I think they look better without it. The pie actually came out looking unscathed.  


Plus this guy was standing by waiting for those graham cracker crumbs.


Then it was time to dip! I used the same recipe for the shell that I use for chocolate covered strawberries - 1 12-ounce bag of chocolate (whatever kind you prefer - this time I used milk chocolate) and 2 tablespoons of vegetable shortening melted in my makeshift double boiler. In the future, I will have to modify the recipe to make the chocolate thinner.


I had to spoon the chocolate onto the pie, which also contributed to the shell being slightly too thick.  


Overall, it was a pretty successful first attempt. The pie was very creamy when frozen, and I think the tartness worked well with the sweet chocolate; although, a couple people found it a bit too tart. My friends had some good feedback and creative suggestions for future attempts.

Monday, June 4, 2012

A Note on the Ripeness of Key Limes

The two dogs currently sleeping on my lap are preventing me from getting up and doing things. At least that's my official excuse for not moving. I'm simply too kind a person to disturb a sleeping creature, even if that creature sleeps 18 hours a day, at least 12 of which are in a bed that contains an unethical amount of down.

See what I mean? Note the comfortably outstretched legs in the background.
Having already spent too much time trapped on the couch by the creatures while scrutinizing how I look in my friend's wedding photos (and reluctantly accepting that I am the antithesis of the Ridiculously Photogenic Guy), I need a more positive task. And being just another food blogger, it seems like the perfect time to write a post.

Last summer, I learned the hard way that key limes are yellow when ripe. Being a bit of a know-it-all, I defiantly challenged my friend Tyler to "google it" to settle our debate about the color of key limes when they ripen. I had to eat crow after Wikipedia proved me wrong. But at least I learned why my first key lime pie was too sour. Until recently, I used regular limes for my key lime pie, so it would have been more accurately described as "lime pie" (but that doesn't sound fancy enough). Regular limes work well for pie and are easier to zest. In fact, I find key limes have too thin and soft a rind to grate easily, so I leave out the zest. I don't think the flavor is diminished by the lack of zest. In fact, a couple of people commented that the pie was a little too tart even without the zest; although, I prefer it that way. Perhaps I need a nice new grater  to test this out.

Notice in this picture the limes range in color from green to yellow.


I used the yellow limes for my two pies. The green ones I saved for another pie. Many of these green limes aren't ripening to an appetizing yellow, but rather are turning from green to brown.  I blame this on having purchased these limes at Walmart (a very unfortunate consequence of unemployment). I imagine if they were from Whole Foods, they would ripen into a lovely, rich yellow and somehow never turn brown or get blotchy.     

The limes don't last long once they turn yellow. The key seems to be to purchase the limes about a week in advance if they are green and then wait patiently until they are the right color. This will be a challenge for me, but the pie is tastier if you use yellow key limes.  


Thursday, May 31, 2012

Key Lime Pie

Memorial Day was Monday, but it was just another day off for me. To celebrate, I decided to listen to Rihanna's Talk That Talk while making a key lime pie. It seemed like a good plan. 

Excuse to show off my manicure
Key lime is an inexpensive pie - perfect for a girl on a budget. It takes about 25 key limes and a lot of work to get 1 cup of juice. While I was busy working my noodle arms juicing limes, the creatures were busy doing this:


I forgot to take a picture of the filling before  pouring it into the crusts.  (Food blogger fail). I was distracted because I was attempting to "whisk" together the sweetened condensed milk, egg yolks, and juice in too small a bowl. This also resulted in the filling not being mixed quite enough; consequently, there were a few yolky spots.  


My brother thinks meringue ruins a key lime pie, but I like it. I made a soft meringue - I think it was a bit too soft. Last time, I made it too stiff, and it became quite sticky the next day. The softer meringue was not sticky, but I think it could have been a bit fluffier. 


I have devilish plans for the meringue-free pie that will be revealed in another post.  


Notice the dot on the left?  I felt the need to touch the pie, thereby marring it for pictures.  (Another food blogger fail). I couldn't resist seeing if the meringue was too soft.

Notice the yolky spots?  Not quite right.

Despite the little failures, this pie was delicious.  It was the perfect combination of light & airy with sweet & rich and delightful with a cup of coffee.  

Key Lime Pie 

Filling:
One 14-ounce can sweetened condensed milk
3 egg yolks 
1/2 cup fresh key lime juice 

Meringue:*
3 egg whites
3/4 cup of superfine baker's sugar
1/2 teaspoon vanilla extract
*Note that in the pictures above, I doubled this recipe but used all the meringue on one pie, hence the nice, thick layer of meringue. I usually make 2 pies, one with extra meringue and one with none.

Crust: 1 premade graham cracker crust (I'm a cheater, but it's not worth the effort to make this).

Preheat oven to 325 degrees.  Whisk the first three ingredients together (in an adequately sized bowl) until well blended.  

Beat egg whites on medium-high speed, gradually adding sugar until it forms soft peaks. Add vanilla during the last few seconds.  

Fill crust with filling, top with meringue and bake on the middle rack for 15 minutes.  

There is no need to cover the pie.