Saturday, June 30, 2012

How to Peel Peaches

This is the easiest way to peel peaches, and it preserves all of the delicious peach flesh. Because peaches are so delicate and juicy, this method is superior to using a knife.  

First, cut an X on the bottom of the peach that is about an inch wide and not very deep. 


Then blanch the peaches for about 30 seconds.


A pasta server is the perfect tool to remove the peaches from the boiling water.


Then let the peaches cool a bit.

See the steam coming off them?

The skin will peel right off.


It's as easy as that!

Thursday, June 21, 2012

Bite-Size Blueberry Pies

Because you love me but you just don't know it yet, I give you bite-size blueberry pies! I thought I was so clever when I came up with this. Miniaturize something - how original! I thought I was even more clever with my inadvertent alliteration when I listened to Brothers by the Black Keys while making bite-size blueberry pies (followed by a sigh and a moment of deep self-loathing).

I took these pies to Shakespeare in the Park, solving the age-old problem of how to include pie on a picnic menu without making a mess. I may use this recipe for pies that I can ship to friends in other cities as gifts (don't get your hopes up, guys).  


I used my tried-and-true crust recipe, seen here. I wasn't sure how the proportions would turn out, so I made enough dough and enough filling for one pie. I ended up with leftover filling, so my recipe below adjusts the blueberries and other ingredients to the right amount. Fortunately, the additional filling allowed me to try this recipe twice in one week.


First, I brushed the mini cupcake tins with melted butter. 


Next, I rolled out the dough, used a glass to cut it into rounds, and pressed them into the cupcake tins.


Then I made the filling and filled the tins to the edge so that they were full but not overflowing. And I morphed into a wannabe Martha Stewart and made teeny-tiny lattice crusts.


But my Marthaesque perfectionism was thwarted when they came out looking like this! I was convinced they were ruined and was deeply saddened by my mini pie failure!  


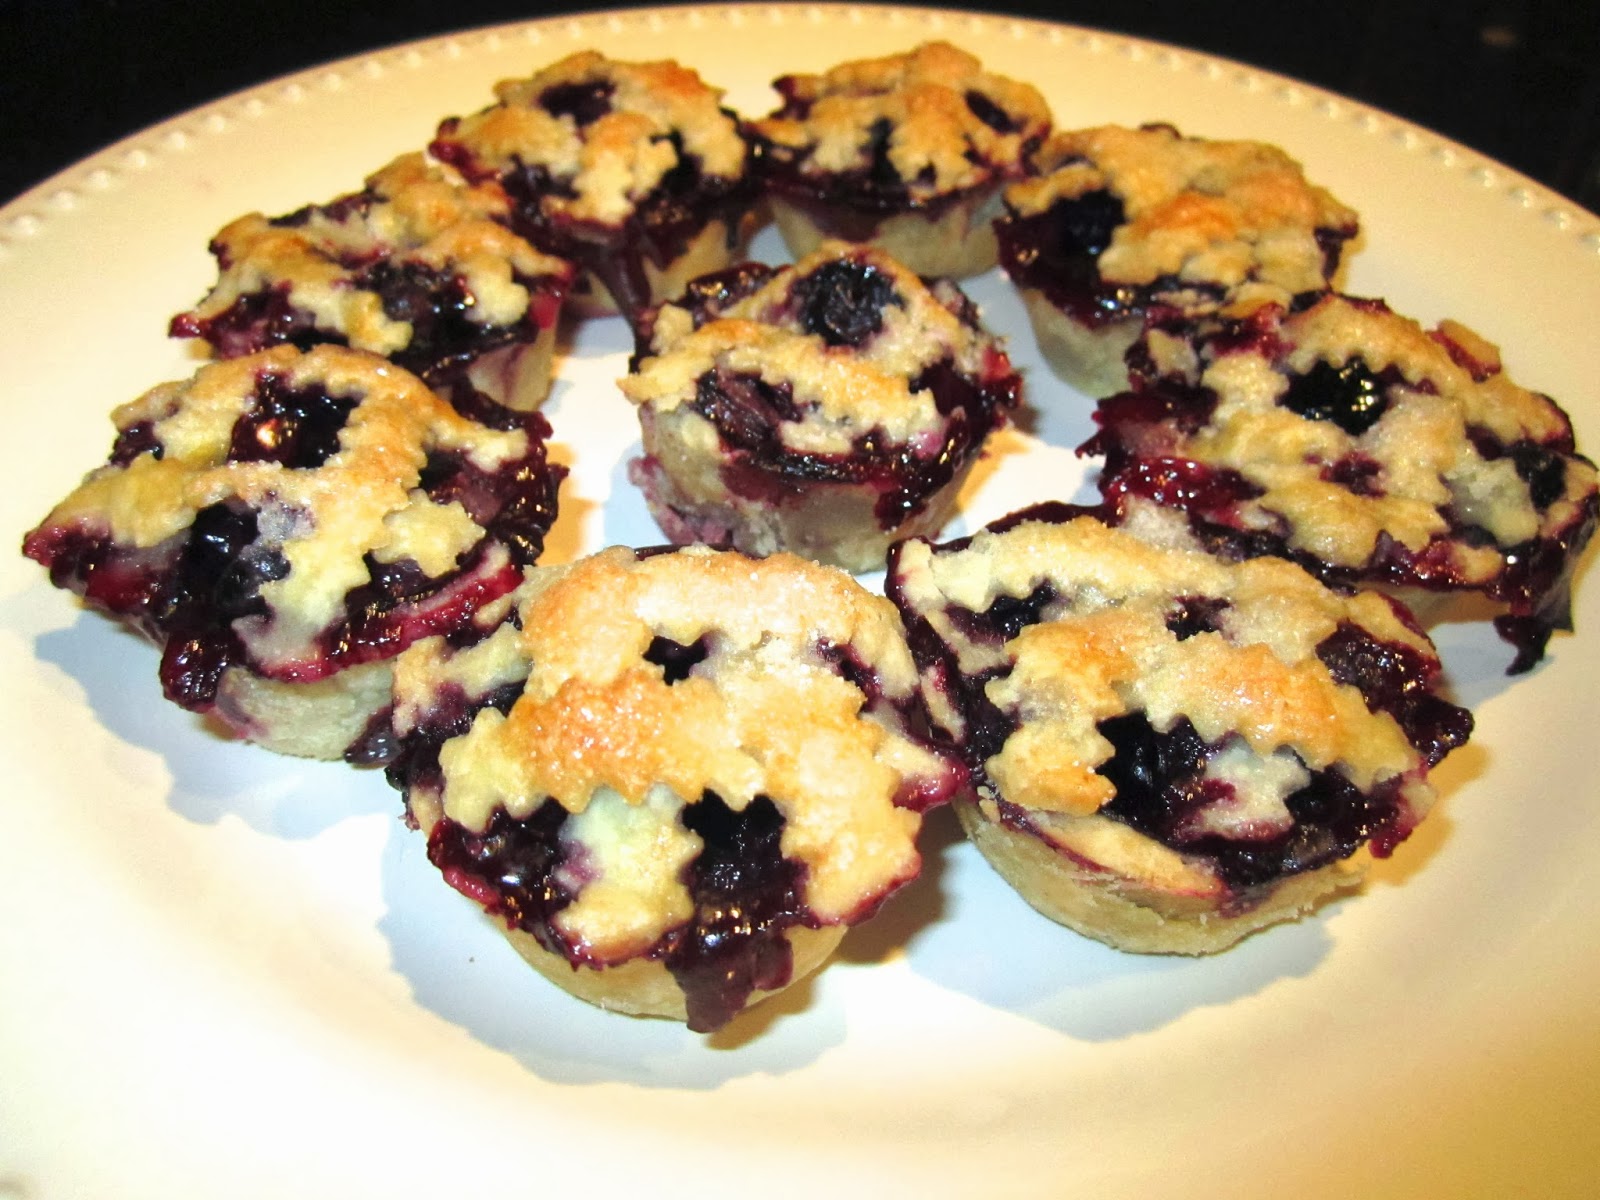
Reeling over my first world problems, I was delighted that they came out of the tins looking like this:


The lattice crust pies were yummy - sweet, tart, and flaky - but there was not quite enough filling in them. Obviously, some was lost when the filling overflowed. To prevent this, next time I will use more constarch or switch to tapioca. I may also mash the blueberries a bit so they will not explode, as I'm convinced that has something to do with the filling overflowing.

Two days later, I tried again with the leftover filling, which I did not alter. This time I opted for a single crust on top rather than a lattice crust. I thought this might help with the overflowing problem. This mitigated the problem but had some collateral consequences, seen below. 


I brushed the pies with egg whites, as I did with the lattice pies, but I forgot to sprinkle them with sugar. The sugar on top is important - it adds a sweet crunch, which is nice because these will probably not be served with ice cream.
   

This batch didn't overflow quite as much, but they ended up being a bit soggy on the bottom. 

These reminded me of Alice in Wonderland.


So I had to add a tiny scoop of ice cream...


Sadly, even though I made these creature-sized delights, the creatures just weren't that into it.


Oh well.

Bite-Size Blueberry Pies

Crust seen here.

Filling: 

3 cups of blueberries
2/3 cup of sugar, plus 1 tablespoon of sugar set aside
3 tablespoons cornstarch or quick-cooking tapioca (this is 1/3 more than I used in the pies shown above)
1 tablespoon fresh lemon juice 
3/4 teaspoon grated lemon zest
1/8 teaspoon salt 
2-3 tablespoons salted butter, half cut into small pieces and half melted
1 egg, separated

Preheat oven to 425 degrees.

Mix blueberries, sugar, cornstarch, lemon juice & rind, and salt. Let stand for 15 minutes. Cut butter and set aside.

Roll out dough to about 1/8 inch or slightly thinner. Cut rounds with a large glass or cookie cutter. Brush pie tins with melted butter, and press dough rounds into the tins. 

Fill the pies until the filling reaches the edge. Do not overfill. Dot each pie with butter, then cover with tiny lattice or single crusts. Brush with egg white and sprinkle with sugar.

Bake for 20 minutes or until top crust is light brown and filling is bubbly.

Enjoy!

Monday, June 11, 2012

Chocolate-Dipped Key Lime Piesicles

Because I don't care if you get fat, here is a recipe for frozen key lime pie dipped in chocolate.
    
This is the same yolky batch as seen here.

I must say that the most time-consuming and annoying part of making these treats was finding those wooden popsicle sticks. I checked Walmart, Target, and a grocery store before resorting to the Dollar Store - a dismal, dismal place. One happy consequence of unemployment is that I don't mind wasting time driving all around town looking for popsicle sticks. It's the little things...


I had a long discussion with Jay while he was in the hospital about the logistics of adding the popsicle sticks without damaging the integrity of the pie. My original plan involved removing the individual slices and then inserting the sticks, but Jay argued that the sturdiness of the aluminum pie tin was essential. After an excessively lawyerly argument, tinged by the worry that our asinine debate would be the last thing his infirm roommate would ever hear, I conceded.

I scored 8 pieces then used a sharp paring knife to make horizontal slits in the foil as seen above. It was easy to insert the popsicle sticks. Next, I put the whole pie in the freezer for an hour.

After an hour, I removed the individual pieces by cutting away the tin - it was a bit of a hack job. 

Perfect for dipping

I put the individual pieces in the freezer overnight. You will notice it was difficult to keep the top edge of the graham cracker crust attached, but I think they look better without it. The pie actually came out looking unscathed.  


Plus this guy was standing by waiting for those graham cracker crumbs.


Then it was time to dip! I used the same recipe for the shell that I use for chocolate covered strawberries - 1 12-ounce bag of chocolate (whatever kind you prefer - this time I used milk chocolate) and 2 tablespoons of vegetable shortening melted in my makeshift double boiler. In the future, I will have to modify the recipe to make the chocolate thinner.


I had to spoon the chocolate onto the pie, which also contributed to the shell being slightly too thick.  


Overall, it was a pretty successful first attempt. The pie was very creamy when frozen, and I think the tartness worked well with the sweet chocolate; although, a couple people found it a bit too tart. My friends had some good feedback and creative suggestions for future attempts.

Monday, June 4, 2012

A Note on the Ripeness of Key Limes

The two dogs currently sleeping on my lap are preventing me from getting up and doing things. At least that's my official excuse for not moving. I'm simply too kind a person to disturb a sleeping creature, even if that creature sleeps 18 hours a day, at least 12 of which are in a bed that contains an unethical amount of down.

See what I mean? Note the comfortably outstretched legs in the background.
Having already spent too much time trapped on the couch by the creatures while scrutinizing how I look in my friend's wedding photos (and reluctantly accepting that I am the antithesis of the Ridiculously Photogenic Guy), I need a more positive task. And being just another food blogger, it seems like the perfect time to write a post.

Last summer, I learned the hard way that key limes are yellow when ripe. Being a bit of a know-it-all, I defiantly challenged my friend Tyler to "google it" to settle our debate about the color of key limes when they ripen. I had to eat crow after Wikipedia proved me wrong. But at least I learned why my first key lime pie was too sour. Until recently, I used regular limes for my key lime pie, so it would have been more accurately described as "lime pie" (but that doesn't sound fancy enough). Regular limes work well for pie and are easier to zest. In fact, I find key limes have too thin and soft a rind to grate easily, so I leave out the zest. I don't think the flavor is diminished by the lack of zest. In fact, a couple of people commented that the pie was a little too tart even without the zest; although, I prefer it that way. Perhaps I need a nice new grater  to test this out.

Notice in this picture the limes range in color from green to yellow.


I used the yellow limes for my two pies. The green ones I saved for another pie. Many of these green limes aren't ripening to an appetizing yellow, but rather are turning from green to brown.  I blame this on having purchased these limes at Walmart (a very unfortunate consequence of unemployment). I imagine if they were from Whole Foods, they would ripen into a lovely, rich yellow and somehow never turn brown or get blotchy.     

The limes don't last long once they turn yellow. The key seems to be to purchase the limes about a week in advance if they are green and then wait patiently until they are the right color. This will be a challenge for me, but the pie is tastier if you use yellow key limes.